The latest release in Determ is the Newsletter, a feature that helps you inform internal and external stakeholders about relevant online content. Curate a list of articles and posts from your Determ Feed and distribute it to your team, clients, or partners as an email newsletter.

In this blog, we’ll guide you through creating a Newsletter and how it can serve your business.
What are the benefits of sending a newsletter with Determ?
With the growing amount of online content and decreasing disposable time to identify relevant information, delivering meaningful insights straight to the right audience is crucial.
A newsletter is a tool that helps distribute key messages directly to your audience’s inbox. Businesses use newsletters to share relevant, curated content with stakeholders like employees, investors, customers, clients, subscribers, etc.
You will undoubtedly find valuable content as you monitor your brand, competitors, and industry online. Every piece of information can guide better business decisions across the board.
With this new feature, you can:
- Share the latest media coverage about your company
- Highlight reactions to your campaigns, products, or services
- Showcase your company’s content from the web and social media
- Keep everyone posted about your competitors and industry trends
- Select a list of articles or posts by any criteria of your choice.
Additionally, you create sections and provide comments personalized to every target audience. That way, every stakeholder can easily understand and digest the shared information regardless of background or knowledge.
How to create a newsletter in Determ
The Newsletter feature is located in the navigation bar.

Click on its tab to start. All newsletters you create will be visible in the table, along with information about their name, publications, recipients, date, and the total number. You can sort newsletters by name or date. Additionally, you can search your newsletters in the top-right corner.

As we mentioned the terms newsletter and publications, it’s essential to understand each:
- A newsletter is a general outline of your email containing default settings, sections, and branding.
- A publication is a single instance of a newsletter based on its general outline containing the content you select from your Feed.
Now, click the Create Newsletter button.
Create Newsletter
Let’s go step by step about creating a newsletter.
Settings
The first step is to define settings. In this step, you will enter the following details:
- Newsletter name – the title visible in the abovementioned table
- Newsletter subject – the subject line visible to its recipients
- Sender name – the name of the person sending the newsletter
- Sender email – the email of the person sending the newsletter
- Recipients – emails of the recipients divided by a comma.
As well as define the branding:
- Background color
- Text color
- Your logo.
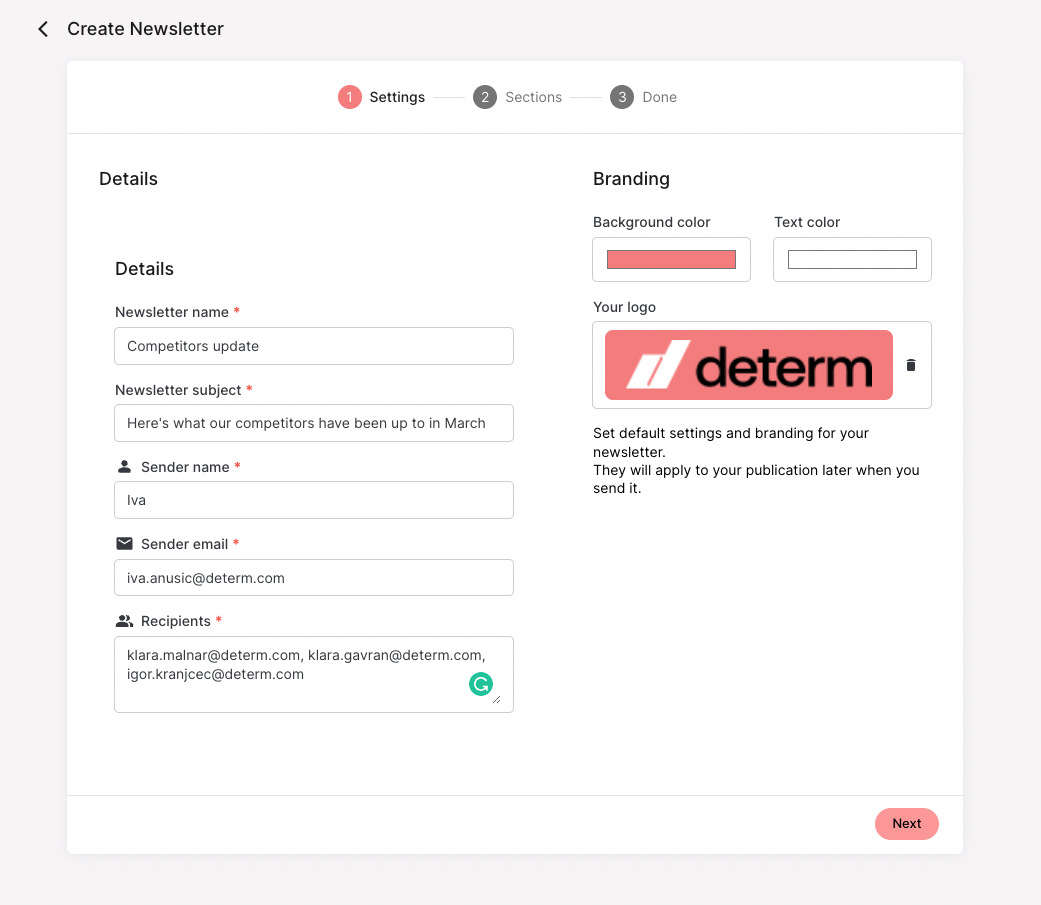
When you enter all information, click Next.
Sections
In this step, you can define sections. That way, you can categorize information and provide context, comments, or explanations for the context in each section.
As shown in this example, the Introduction text title briefly describes the information our recipients are about to read. We have then added a section for each competitor.

You can create sections for any topic or by any choice criteria. For example, you can section by:
- Owned and earned media
- Brand, product, or service
- Campaign
- Hashtag
- Competitor
- Key people
- Time
- Etc.
When you’ve added all your sections, click Next.
Done
Good job. Your newsletter is ready. In the final step, you can choose to save it as a preset (a template to reuse over again) or create a publication and send it.

Both options will save the newsletter for future use. If you want to return to it later, save it as a preset. Once you do, you will be directed back to the table with the newsletter you just saved visible on the list.
If you click Create publication, you will go straight to the publication builder we will discuss next.

Click the Create publication icon on the right to create and send a publication.
New publication
This is where you can set up the content for your publication. As you can see, the general outline we defined for our newsletter is on the left.

In the first section, you can provide more information or context about the topic of your publication. Here is the Introduction text title we defined. Below that, you can continue with the introduction text.

Next, you can see the sections we defined earlier. Click on each section to determine which mentions you want to include.

The right side half of the screen contains the feed you select. It has the same options as your standard Feed:
- Select a topic
- Filter results
- Define the time
- Search mentions
- Sort mentions.
Any option to refine the feed will remain the same as you switch from topic to topic, as we will do for this example. All mentions are interactive and contain the same metrics as in the Feed.
To select them, check each mention’s box in the upper right corner. The process looks like this:

And the results should look like this:

When you’re happy with the selection, click Next.
In the final step, you can:
- Change the newsletter details if needed
- Send a preview to any address, so you can check if everything looks good before sending
- Send now, save as a draft, or schedule to send at a later time and date.
The button in the bottom right corner will adjust depending on your choice of when to send the publication. Click to Send now, Save as draft, or Schedule to complete the publication.
For example, you can select to save the publication as a draft. Now, you can see the drafted publication for this specific newsletter in its table.

From here, you can click the publication title to edit if needed.

Continue to send it now or schedule the publication, just like when you initially created it.

How the newsletter looks like when sent
And that’s it. When this newsletter publication lands in our recipients’ inboxes, it will look like this:

The full preview is here:

When you send them, you’ll be directed back to the table.

As you can see, our first publication is counted.
How to edit or delete a Newsletter in Determ
You can always edit a newsletter and the preferences you initially set.
If you hover over any newsletter in the table, you will reveal the Edit and Delete icons next to the Create publications icon.

Edit Newsletter
If you click on Edit in the table, Determ will direct you to the same steps as when you created your newsletter, with the information ready to be edited.

Follow the same process to make changes as needed.
Delete Newsletter
If you choose to delete a newsletter, beware that you will also delete all its publications.

Click Delete to confirm the action.
To summarize, you can now share key information even easier
The Newsletter is a great tool to leverage the online media insights you gather with Determ and keep key stakeholders informed. It is another tool that Determ offers to help you, your team, or your clients drive better business decisions.
Creating a newsletter takes three easy steps. Define your newsletter’s look, curate its content, and choose when and to whom to send it. There is no limit on how many newsletters or publications you can send.
It will be enabled for all currently active paid plan users for the next two weeks. After that, it will be available on select plans.
Book a demo and let our experts show you the full power of our Newsletter feature.